Do you have PDF documents that you wish to be converted to Word? Here is a free online tool that allows you to convert PDF documents into word and have them emailed to your email account.

Requirements: Email account

Visit this website: http://www.pdftoword.com/
Picture
You will will see the screen above, simply follow the instructions on screen.

 
This tool is fantastic for anyone who is studying or writing reports with references in them.
Click on the Reference tab on the ribbon.
Picture
The best way to use this tool is to enter your references as you go. To add a reference click on Manage Sources, The dialog box below will display.
Picture
You will notice the list of references that are already stored on my computer in the left hand box. This is a great resource of all the journals, books and articles that you have referenced in the past.
To create a new reference click on New, the dialog box below will display.
Picture
Select your type of source. (this is important as it changes the options you need to fill in)
Click on Edit next to Author the box below will display
Picture
Enter the Authors Last, First and Middle name, Click Add.
If you wish to add another author, type in the names again and click Add, when you have finished click on OK
Fill in the rest of the information as shown below
Picture
Once you have filled in all of the required information click on Ok
You will need to make sure that the reference is listed under the current references 
Picture
If the reference is not on the current list, click on the reference and click copy => this will transfer the reference into the current list.
Picture
To insert and in text citation click on Insert Citation and a list similar to the one on the right will appear with a list of all your current references. 
Click on the reference you wish to insert and it will be placed where your cursor is.

Picture
Once you have completed your Report and want to insert a bibliography simply create a new page at the end of the document and click on bibliography. This will automatically create a bibliography at the end of your report that can be updated.


Using styles is a great time saver for formatting text and headings in your documents. If you are intending on using a table of contents then you will need to use styles for your headings and sub headings. You will find your style options on the home tab under styles.
Picture
To expand your style options click on the drop down button on the right hand side of the style selection box.
Picture
For the main headings in your document, select Heading 1
For the sub headings in your document, select Heading 2

Highlight or select the text that you wish to apply the heading to and click on the Heading style. You will notice your text changes to the format of the heading.

Modifying Heading Styles

To change the styles formats we must modify each heading style what we are using.
To modify a style right click on the style and click modify.
Picture
Picture
The display box to the right will display, you can change all font options and alignment options to customise the heading to your specification. Once you have changed the heading styles, click on the Ok button.

You can modify all of your heading styles individually to suit the needs of your documents once you have applied the heading style to your document you can then using the contents page function.


A table of contents is essential for lengthy documents like annual reports, books, and other types of documents. Fortunately, creating a table of contents in Microsoft Word 2007 is quite easy. With a few clicks of your mouse, you can insert a formatted table of contents in your document. And, adding entries to your table of contents is as easy as clicking a button.

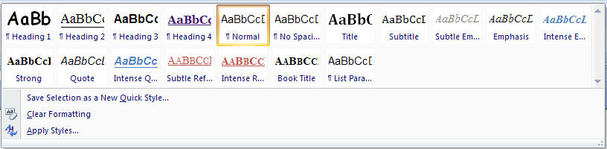
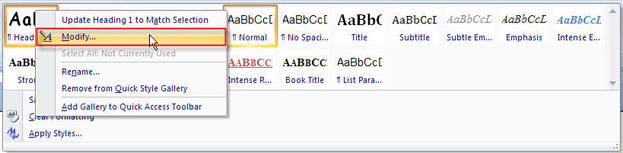
Before creating your table of contents you must ensure that you are using styles for your headings in your document. For example, main heading would have style Heading 1, sub headings would be style Heading 2. Click on the Microsoft Word category for instructions on using styles.
Picture
Word 2007 provides different options for inserting a table of contents in a document. First, you can opt to insert a pre-formatted table of contents. Or, you can insert a customized table of contents in your document.

Decide whether you want to customize the formatting of the table of contents before you insert it in your document.

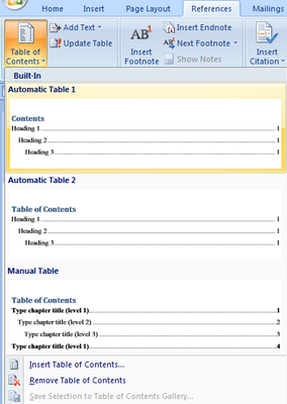
To insert a pre-formatted table of contents, position your cursor where you would like to insert the table in your document. Open the References ribbon. In the Table of Contents section, click Table of Contents. In the dropdown box that appears, select Automatic Table 1 or Automatic Table 2.

Picture
To insert a customized table of contents in Microsoft Word, position your cursor where you would like to insert the table in your document.

Open the References ribbon and click Table of Contents in the Table of Contents section. In the dropdown box that appears, select Insert Table of Contents.

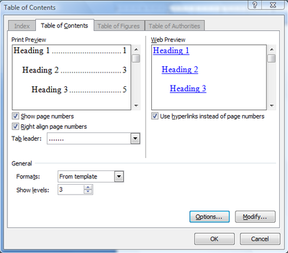
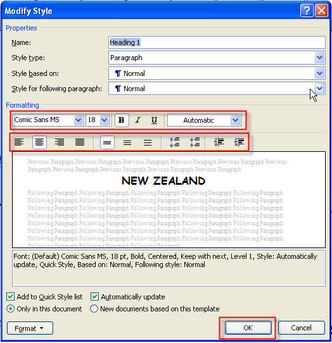
The Table of Contents dialog box opens. You can specify whether page numbers are shown and how they're aligned. You can also specify how the tab leader line appears. Or, use the Formats box to select a formatting style for your table of contents.

Word will automatically pull entries for your table of contents from the document. But, you have several different options for marking table of contents entries. Keep reading for details.

Picture
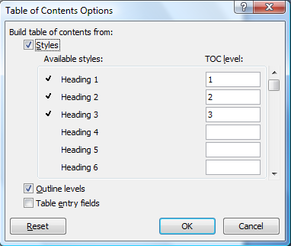
You have different options for marking your table of contents entries in Word 2007. In the Table of Contents box, click Options. The Table of Contents Options box opens.

If you're working from an outline, select Outline levels.

You can also build your table of contents from styles. Select Styles in the Table of Contents Options box. Then, use the Available styles box to specify the styles that you will use to mark table of contents entries. Just enter the table of contents level for a style in the TOC level column.

Finally, you can mark table of contents entries manually. Just select Table of entry fields in the Table of Contents Options box.

Note: If you choose, you can use a combination of some or all of these marking options.

Once you've specified your table of contents options, click OK. Then, click OK in the Table of Contents box to close it. Your table of contents will appear in your document.

Picture
Word will automatically build your table of contents based on your selections.

If you selected the option to mark table of content entries manually, you can mark entries easily. Just select the text you would like to mark. Then, press Alt+Shift+O. The text will be included in your table of contents.

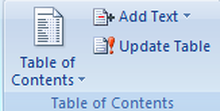
After marking an entry, you may want to update your table of contents. Open the References tab. In the Table of Contents section, click Update Table.